GRACE UNDER PRESSURE
  • Blog
  • About
  • Act Now
  • Updates
  • THESIS
  • Contact


BLOG BY GRACE C. YOUNG


Underwater Interventions 2017 Abstracts

2/20/2017

Comments

 
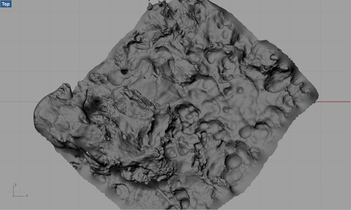
In February this year, Scott, Vance and I from the Pisces VI ​submarine team presented at the Underwater Interventions conference in New Orleans. I also presented on my academic research in 3D modelling coral reefs. Our abstracts from the two sessions are below. 
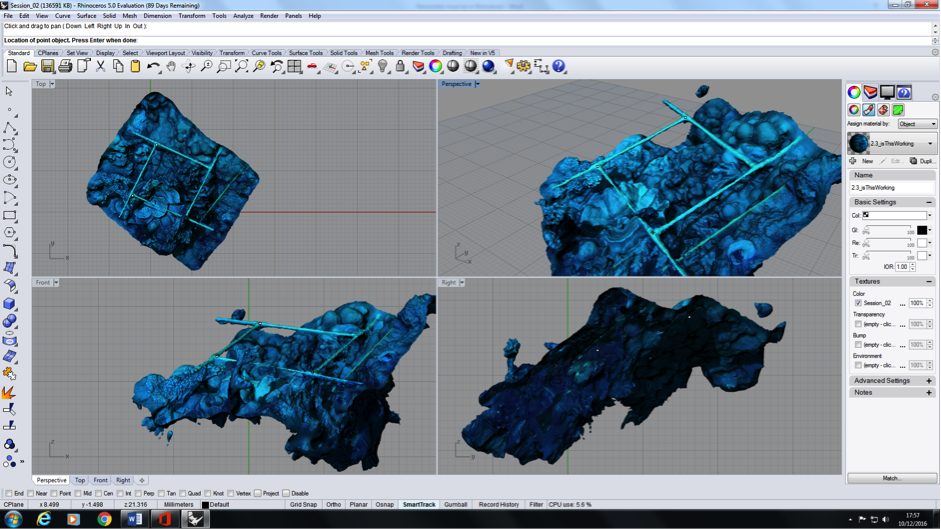
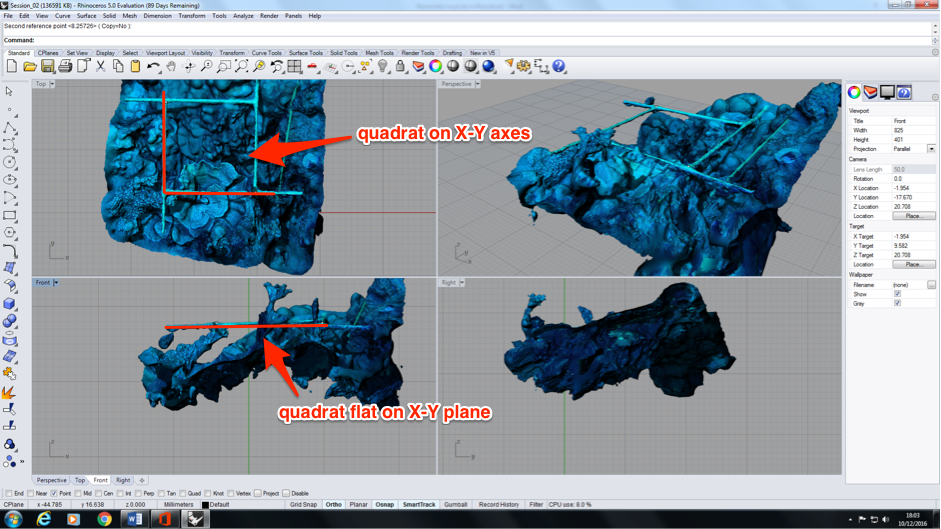
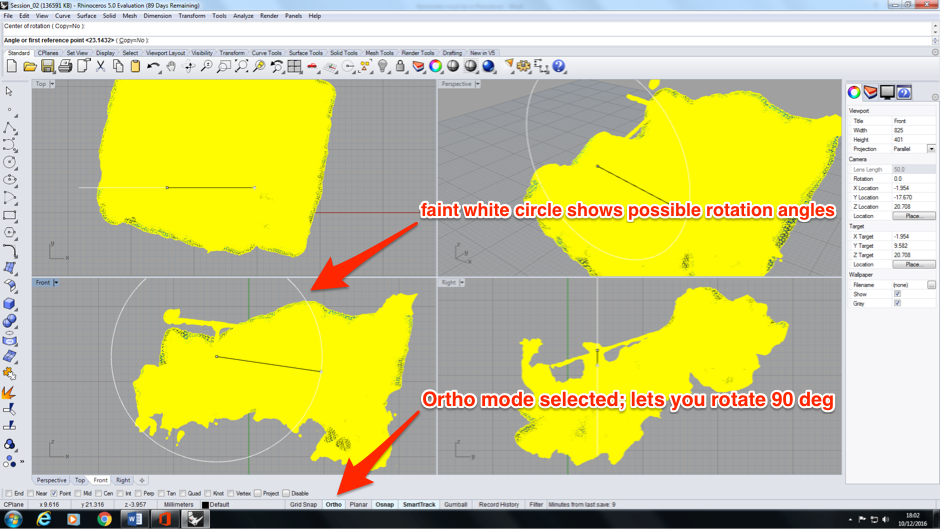
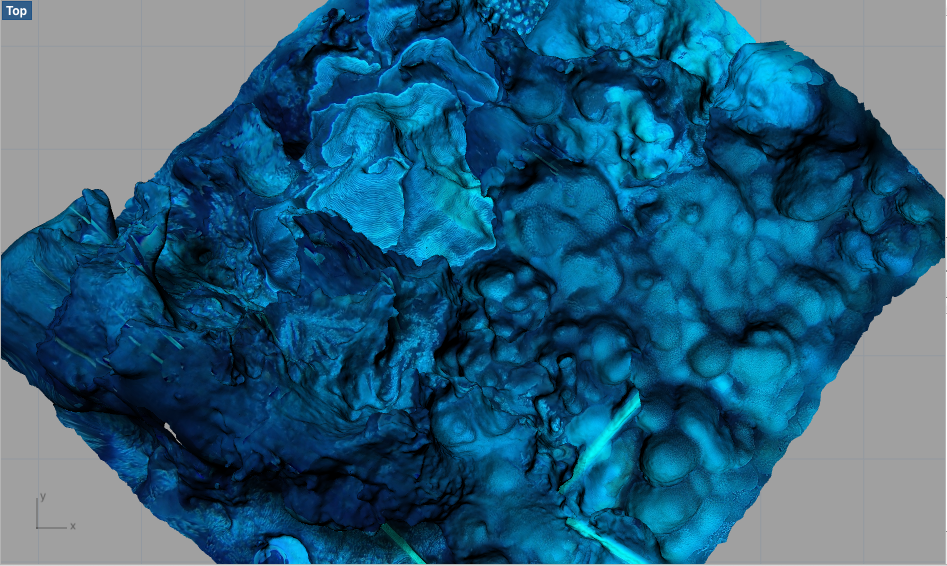
Comments

HOW TO SAVE 300 DPI FIGURES FROM POWER POINT ON MAC

1/28/2017

Comments

 
This is the only way I know ATM: 

(1) In PowerPoint, click Print (Command + P), and then choose "Save as PostScript..."
(2) Open the PostScript (.ps) file in Preview. Export it as a TIFF. 
(3) Choose your favourite cropping software to crop the TIFF, which should be 300 dpi. 

**Be sure that in PowerPoint you use the Insert tool to place images. Do not drag/drop or copy/paste images into the file, because this results in a 72 DPI image.
Comments

PHOTOSCAN - LINUX UBUNTU BUG WHEN SAVING .PSZ

12/14/2016

Comments

 
Problem: You're working in PhotoScan on Ubuntu and click "save.”  Like any normal program it asks you to enter a filename. Say you type "Filename" and then press "Save." All great. Then, you go to open your file the next day, and it's not showing up anwhere yin the file browser. You see it in "recent files," but not in the file browser at all! What happened to your file? 
 
Solution: Who knows why, but in PhotoScan on Ubuntu I’ve found that you can only see your saved PhotoScan file if you manually add “.psz” at the end of your file name in the save dialogue (or in your script that's writing files). So, in the above example I should’ve written “Filename.psz”.  
 
Hope that helps somebody.
​
I'm using PhotoScan Pro on Ubuntu 14.04.3. 
Comments

HOW TO ROTATE 3 POINTS FLAT IN RHINO

12/10/2016

Comments

 
I've been teaching students how to manipulate 3D models in Rhino so that they can research using 3D models of coral reefs. After a 3D model is imported into Rhino, the first step in analysis is to orient and scale the model in 3D space. This task, although simple in theory, can be tricky for Rhino-novices and is what I teach as soon as students open Rhino. It can be frustraiting at first, but within a half-hour or so students usually get it and it becomes like second nature. Here's the method written out. 

FIND SCALE OBJECT

​We place a known object in all our 3D models to use for scale and orientation. In most of our reef studies, that object is a 1 x 1 m PVC square (called a "quadrat"). In order to be consistent across all our models, we always place one corner of a quadrat at the origin (x = y = z = 0) and align the adjacent quadrat edges along the X and Y-axes, so that the quadrat rests in the first quadrant. Make sure you can see the quadrat in your 3D model. View > Zoom > Zoom Extents All may be useful, as will zoom, pan, and spin operations. You can move around your 3D model by holding down the right-click button while you're in a viewport. 
Picture
Before: Quadrat is randomly oriented in 3D space.
Picture
After! Quadrat is aligned with X-Y axes, flat on X-Y plane.

ON WINDOWS:

(1)  Place the Object Snap toolbar at the bottom of your screen to make your life easier. To do this, go to the Tools menu at the top of the screen, Object Snap > Persistent Osnap Dialog. You should see the menu appear as a strip under the viewports. 

(2) Type Points in the command prompt at the top of the screen. 

(3) Click Tools > Object Snap > Persistent on Mesh. Choose the reef mesh when it asks (the prompt will be at the top of the screen near the command line). Then, place a point at each of three corners on the quadrat in the 3D model. It will probably be easiest to do this from the perspective viewport. When you are finished placing points, hit Enter. 

(4) Hit Control+A to select everything, i.e., both your reef mesh and the three points you just created. Type Group and then Enter at the command line. This is just like the group feature in PowerPoint.

(5) Type Move at the command line and then Enter. It'll ask you to select the object to move. Click the reef mesh and then hit Enter. Now it'll ask for the point to move from. Of your three points, choose the point that's between the other two. To make sure you choose your point and not some random place in 3D space, tick the box next to "Point" on the OSnap toolbar (see step (1)). [Note:  It'll be hard to see where your three points are now that the model is selected, so you've to run your mouse around the model to find them, or remember roughly where they are. If you really can't find them hit "Esc," and then SelPt to see your points and start Rotate again.] Hit Enter and then it'll ask you to select the point to move to. You want to move this point to the origin. To make it easy to select the origin, in the lower toolbar make sure "Grid Snap" is selected and all other features are de-selected there. Zoom and Ortho modes will be useful.

(6) Now you want to rotate your model so that the three points all lie on the X-Y plane. To do this, type Rotate then hit Enter at the command line. It will instruct you to select the object to rotate. Click on the reef mesh and then hit Enter. It'll then ask you to select the center of rotation. Click the center ploint you placed at the origin; make sure the box next to "Point" on the OSnap toolbar is still ticked to help you find this point. It'll next ask for the "Angle or first reference point." Let's start by working in the Top viewport. Select one of the other points in the Top viewport. You should see a faint white circle in the Top viewport showing the possible places of rotation. After you've hit Enter, it'll ask for the second reference point and as you move your mouse around you'll see it rotates the model. Here, you want to make sure Ortho mode is selected in the lower toolbar; this'll restrict your movement to 90degs. Rotate your model so that the point rests on the X-axis. 

(7) Use the Rotate command again, this time working in the Front and Right viewports to align the points onto the X-Y plane. 

​(8) Now your quadrat should be flat on the X-Y plane! 
Picture
Rotating in the Front plane.

ON MAC:


Questions/comments/something still not working? Comment below and we'll work it out.
Comments

THOUGHTS ON THE PEER REVIEW PROCESS

11/17/2016

Comments

 
A few weeks ago I submitted my first paper to a peer-reviewed journal. At the recommendation of my supervisor, we submitted to Limnology and Oceanography: Methods. I thought I could whip the paper together in about two weeks; after all, I'd already had the paper outlined, collected all data and made the graphs during field season. But no... I was surprised at how much time is required. In the end, it took nearly two months of careful writing, reorganizing details, and bouncing drafts between my supervisors for review. Now we play a waiting game. It could be months or a year before it's published. 

I expressed my impatience to a fellow PhD friend at Harvard while visiting Cambridge a few days ago. She laughed:  "Two months! It can take years for a paper to form even after data is collected and analysed!" That made me feel better. Likewise, yesterday a friend here at Oxford excitedly said he got a paper published this week... a paper that was first drafted three years ago! 

The peer-review process certainly has its faults, and some journals are aiming to fix that like PeerJ and arXiv. That said, it's one of the few means of having others in your field critically analyse and validate your work. It's a delicate balance between disseminating information among the scientific community as quickly as possible and ensuring that information is worthwhile and  credible. 

A few bits of advice that I received prior to paper-writing that certainly helped: 
(1) Don't throw any data away. Save everything. Record everything.
(2) Write down everything and date all your notes. 
Comments

BUG IN MS WORD: INSERT > CROSS-REFERENCE... TURNS TEXT INTO REVIEWER COMMENTS UPON PDF CONVERSION

10/23/2016

Comments

 
Today I discovered that upon converting a Word file into a PDF (either via "Print" or Save As > PDF), Word automatically modifies Figure, Table, Equation etc. references that I've inserted via Insert > Cross-reference. It makes them into reviewer comments, changing their colour, underlining, and requiring the user to "Accept Change". It also inserts full equations in-line by their reference and bold-faces references, whereas I previously turned that feature off. The error occurs despite "Track Changes" being "off" and persisted on a PC. The Internet suggested this has something to do with hidden bookmarks, although I did not find any remedies to the problem (although others seem to be having the issue as well e.g., here). 

Unfortunately the only solution I arrived at was to re-type all references where they were previously inserted via cross-reference. Even then, some elements of equations appeared as reviewer comments (e.g., only the division line in an equation appeared as a comment, while the rest of the equation stayed normal; strange!). In order for these not to appear red (as comments) on the PDF, I needed to change the document vew to "final" rather than "final showing mark-up" in the Review pane (image below). Accepting each change does not solve the issues, as they automatically become comments again upon converting to PDF. ​​
Picture
I'm using Microsoft Word for Mac 2011, although I believe this issue exists in other versions of the software. This experience as well as others reinforces my prefer for LaTeX over Word. I generally use LaTeX for everything, even class notes, but could not use in this instance per the requirements of an academic journal. 
Comments

Rhino Not Showing color or texture on imported 3D model

4/29/2016

Comments

 
"I'm trying to import an OBJ (with MTL) file into Rhino, but it's just showing up grey. How do I get the correct textures/colours to show?" Ideally I'd have answered on this forum where someone asked same question, but I couldn't make an account there without paying, so here we go. 
Picture
What you want... (colors!)
Picture
What you have...
In PhotoScan, when you export your 3D model as a wavefront (.OBJ) file, it creates not only an .OBJ file, but also associated .mtl and .jpeg files. SAVE THESE FILES WITH THE .OBJ. They encode the model's color mapping. Sometimes Rhino isn't smart enough to associate these files with your imported .OBJ, however, so you need to help it. 

On RHINO FOR MAC

Picture
(1) To see a model's color (or "texture") in Rhino, you'll need to be viewing in "rendered" mode. To change a viewport to rendered mode, right click in the view panel and select "Rendered" or use the shortcut ^⌘R.
Picture
(2) If the color file is correctly linked with your 3D model, you'll now see color in that viewport! If it's showing grey, however, you'll need to proceed to step (3).
Picture
(3) If your rendered 3D model is still grey: Right-click the object, select "Object Properties," then under "Material" click "edit." Under the "Textures" menu, make sure "colour" is checked. For the "Map file," un-load the file already there (if there is one; and even if it's the correct one) by selecting the option "Choose..." Then, re-load the correct image file. This should add the correct colours to your object.

RHINO FOR WINDOWS

Picture
(1) To see a model's color (or "texture") in Rhino, you'll need to be viewing in "rendered" mode. To change a viewport to rendered mode, click the little arrow by viewport name in the upper-left corner of the viewport and select "Rendered." You need to do this for each viewport you want to see color.
Picture
(2) Here it gets involved: (2.1) Select your model. (2.2) In the right-side menu, on the "Properties" tab, click the square with alt-text "Material." (2.3) In this menu, go down to "Texture" and then "Color." Here you can click the three dots next to the file (this isn't clearly a button; just click on the dots) and choose the image file associated with your model.
Picture
(3) Now you should see the colors mapped onto your model in the viewports that are in "Rendered" mode!

Still having issues? Post a comment below and we'll figure it out.
Comments

IT'S OFFICIAL... 

2/26/2016

Comments

 
I'm listed as a researcher on our group's website: 
http://oxfordoceanresearch.org/people/grace 

The page (screenshot below, full text at above link) includes contact information, research interests, work experience, writing and conference proceedings, selected talks, etc. Note, links to our old website (e.g., http://www.zoo.ox.ac.uk/group/oceans/people/GY.html) no longer work. 
Picture
Comments

EXPORT HIGH-RES PDF FROM BLURB BOOKWRIGHT

1/26/2016

Comments

 
You need to pay $5 to export your BookWright creation as a high-resolution PDF. You can get low-resolution PDFs for free though. To get a high-res PDF, click "Upload" in the upper right corner and then go through the steps for ordering one PDF and zero hardcopies. 
Picture
BookWright is a free software from Blurb (for Mac OSX and Windows) for laying out professional-looking books, magazines, and eBooks. It's much more user-friendly than InDesign or other layout/graphic design software. I've been using it for a side-project with the Kuwait Dive Team. I'm baffled by it's low "user's rating" in this comprehensive review and would highly recommend it.  ​

Comments

Embed PDF VIEWER IN TEXMAKER

11/17/2015

Comments

 
As a default, in Texmaker the output PDF from your LaTeX code pops up in a separate window. I prefer the PDF to be in the same window as my code so I don't have to switch between windows as much, however. So how do you get the PDF to show-up in the same window as your .tex code...
  • ​Click Texmaker > Preferences
  • Under "Commands" tab, under "PDF Viewer," check “Embed.” 
  • If you have a small screen, like I do, you can’t really see this option (see screenshot below!), and there is no way to expand the window. (Hello Texmaker! I love your software, but this is an issue). 

​Hope that helps somebody! 

I'm using OSX 10.9.5. 
Picture
Comments
<<Previous
Forward>>

    Author

    Same author, Grace. This is where I make technical notes, usually related to my PhD. My slightly more exciting blog, Grace Under Pressure, is here. 

Grace under pressure

 MORE BLOG (ALL)        WHAT'S M31 ABOUT?        UNDERSEA GRADUATION